| |
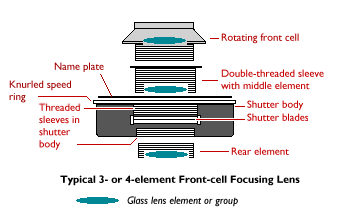
- Unscrew the sleeve containing
the middle element. This may have slots in the rim to allow you to use
a spanner. If no slots, try a rubber stopper. If that doesn't free it,
you will need a lens wrench, typically about 1 1/8.
If you do not intend to work on the shutter, be careful
to keep the knurled speed dial and name plate in place, since these
are usually held on by the flange on the threaded sleeve.
- Remove the rear cell in the same
way.
- Dirt is likely to have mixed
with the lubricant used for the front cell so clean all metal surfaces
with naphtha and wipe them with a clean paper towel. If you don't do
this first, you risk carrying this abrasive mixture to the optical surfaces
as you are trying to clean them with Windex.
- Clean the optical surfaces in
the prescribed way.
- Determine if you need to do internal
shutter maintenance, then do it following the prescribed procedure,
or:
- Clean the outside surfaces of
the shutter body, speed ring and name plate with naphtha.
- Reinstall the rear and middle
cells until they are snug. Tighten the middle cell with a lens wrench,
if you have one, otherwise use a rubber stopper.
- Place a very thin coating of
lithium grease on the front cell threads, keeping it well away from
optical surfaces.
- Placing the front cell in the
sleeve with the focus scale in the same relative position it was when
it came free, try to start the threads in the sleeve. Continue screwing
the front cell into the sleeve until it contacts the speed/name dial.
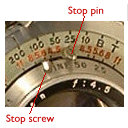
If the scale marking nearest the stop pin in as it was when you removed
it, go to the next step. If the scale mark in relation to the stop pin
isn't the same, you have not started the threads correctly. Remove
the front cell and turn it 90° and start threading. Repeat this
adjustment procedure until the scale marking is correct. Having the
front cell in the correct position to the rest of the assembly is critical
for focusing accuracy.
- Back the front element out until
the Inf position of the scale passes the stop pin, then reinstall
the stop screw.
|


