| |
|


|
|
|
| |
CAVEATS
- All lens cleaning should be done
very carefully. Use only photographic lens cleaning fluid, Windex
or one of a select group of alcohols, and optical tissue or white, unperfumed
facial or toilet tissue. Remove fingerprints as quickly as possible.
Never use any kind of abrasive on a lens.
- The
conservative view is that only photographic lens cleaning solution,
with the correct pH balance, is safe for lens coatings. Similarly facial
or toilet tissue may be safe for the functions intended, but may contain
substances that can interact negatively with lens coatings.
- Kodak's advice was: "An
occasional cleaning of both rear and front lens surfaces is necessary.
Care should be used not to scratch these lens surfaces while cleaning
them. Any dust or grit should be removed first by gently brushing the
surface with wadded Kodak Lens Cleaning Paper or a fine camel's-hair
brush. If this brushing action fails to clear the lens, wipe it gently
with a wad made from one or several sheets of Kodak Lens Cleaning Paper
or a clean, soft, lint-free cloth, such as well washed linen. In the
case of fingerprints or any other grease or scum formation, the use
of a drop of Kodak Lens Cleaner on the cleaning paper or cloth or breathing
on the lens is suggested. Do not use acid, alcohol, or other solvents
or harsh, linty cloth. Avoid excessive cleaning and excessive pressure,
as they may do more harm than good."†
- One expert
 suggests that only disposable brushes made from paper tissue be used,
since regular lens brushes inevitably pick up contaminants.
- A small syringe, like the ones
used to rinse human ears, can be used as a source of clean dry air to
blow dust from lens elements. Best to have separate syringes for ears
and lenses.
LENS COATINGS
- Before the mid 30s, lenses had
no commercially applied coatings
 .
Although the effect of lens coatings was observed a couple of decades
earlier, these coatings were not intentionally applied, but fortuitously
present. In the mid-30s, lens designers began experimenting with thin
deposited coatings to reduce reflection on glass surfaces that cause
flare and to correct chromatic aberrations. Coating is visible as a
coloration in the glass. On modern multicoated lenses, this coloration
is very obvious. On older single-coated lenses it is likely to be more
subtle. .
Although the effect of lens coatings was observed a couple of decades
earlier, these coatings were not intentionally applied, but fortuitously
present. In the mid-30s, lens designers began experimenting with thin
deposited coatings to reduce reflection on glass surfaces that cause
flare and to correct chromatic aberrations. Coating is visible as a
coloration in the glass. On modern multicoated lenses, this coloration
is very obvious. On older single-coated lenses it is likely to be more
subtle.
- Originally calcium fluoride was
used, and by 1940 standards it was effective, but because it remained
soft after deposition, could only be used on inner surfaces. Magnesium
fluoride was later used by Kodak. After deposition on the lens surface
it became very hard. Calcium fluoride was only used by Kodak for a few
years, beginning in 1938. If you have a camera manufactured from 1938-45,
and you see no evidence of outer coating--the lens viewed from different
angles looks like clear, colorless glass, you should probably rely on
an qualified technician--one who specializes in older optics
and is familiar with Kodak lenses--to clean inner surfaces.
- Even the harder coatings can
be damaged, either through abrasion or possibly by some chemical interaction
with cleaners or from atmospheric deposits. This kind of damage will
appear as scratches or as light spots in the coating.
- Lenses can be cleaned and recoated,
but this may not be practical except for the most expensive lenses.
|
|
|
| |
LENS DETERIORATION
- Besides scratches and coating
faults, lenses can deteriorate in two other ways.
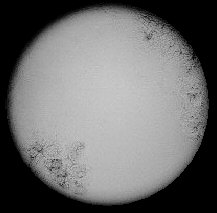
- They can be attacked by fungi,
which happens most often when they are kept in high humidity. An
illustration of fungus is shown at the right with its characteristic
webby structure. Fungi can attack the coating only or can etch the
glass itself. Fungi may be on inner, exposed surfaces or between
cemented elements. If you can remove the damaged elements and clean
the fungus from the lens surface, also thoroughly clean the mount
since spores will also hide there. Success has been reported with
ammonia, vinegar, and naphtha. Most lenses described on this site
are of simple construction with few or no mechanical linkages. They
can be completely disassembled and flooded with naphtha to expose
both the glass and mount to the cleaner. (See note above about
lenses with calcium fluoride coatings.)
- A lens with fungus damage
between cemented elements will have to be uncemented, cleaned and
recemented--probably only practical for the most expensive lenses.
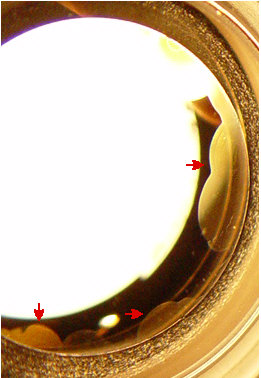
- The material used to cement
lens groups may deteriorate. In some lenses this will appear as
cloudiness, generally around the outside of the glass where the
adhesive has failed. In modern, multicoated lenses, this will generally
appear as a reflective area in an otherwise transparent element.
The best way to see this is to move a lens under a fixed light source;
the problem will be very apparent at certain angles; be sure to
look through the lens from both front and back. Lens cement can
be dissolved with acetone and new cement can be obtained, but you
must cement elements so that their optical centers coincide and
insure that no foreign material is trapped between the elements.
Most collectors will find this operation beyond their abilities
and will rely on technicians with sophisticated electronic gear
that can do accurate centering and have cleanroom conditions to
insure clean joints.
- Lenses with damaged coating
can be recoated, but again this is expensive and probably only practical
for the most expensive lenses.
- Coating problems, scratches,
fungus damage and separation will cause reduced contrast and increased
flare, generally in proportion to the placement of the flaws and
the area of the lens surface they occupy. These flaws will affect
market value to collectors and photographers, pretty much in proportion
to the seriousness of the flaws and the cost of restoration, where
that is possible.
- Store your equipment in dry,
clean, well-ventilated areas. Cameras should not be stored in leather
or cloth cases, since these materials attract fungus in humid conditions.
|
|

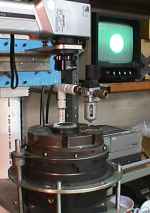
A lens with fungus

Lens recementing technology at Steve
Grimes' shop

A multicoated lens with
serious separation problems
|
|
|
| |
CLEANING PROCEDURE
- Begin by brushing off dust with
a camelshair or other very soft lens brush. Clean compressed
air can be used. Moisture condenses in air-compressors, however, causing
rust, and using air from such sources has the potential of depositing
debris on lens surfaces.
- If you can't get your lens sparkling
clean with air and brushing, then dampen a piece of lens cleaning tissue
with lens cleaning fluid and gently wash the surface of the lens. Lay
a piece of lens cleaning paper or tissue on the lens and squeeze one
or two drops of fluid on the paper, then pull the wet paper across the
lens. Use a mopping rather than a scrubbing technique, repeating this
operation with clean paper and fluid.
- Methanol or pure grades of alcohol
can be used as a solvent to remove oily residue; you may have to repeat
this with clean tissue and more liquid. (See Conservative View
 ) )
- Do not use tissue without liquid.
- I find that lens cleaning tissue
leaves fewer streaks on the glass, perhaps because it has fewer 'impurities'
than toilet tissue, so with a dirty lens, I start with toilet tissue
and finish with a sheet of lens tissue.
REMOVING LENS ELEMENTS
- Many of the Kodak lenses described
here are three and four element designs. These will usually be mounted
in shutters so that the elements screw out.
- Cameras without rangefinders
usually had front cell focusing, which depended on a threaded front
cell mounting for scale focusing. Click this link
 for a new window with the procedure for cleaning this kind of lens.
- Kodaks with rangefinders will
have front cells that are threaded but tightened in the shutter mounting.
There are special brass and plastic wrenches used by technicians to
remove lens elements and if you have many cameras you may want to invest
in some of these. Technicians also use rubber bottle stoppers to remove
lens elements and you can find these in hardware stores. Place the clean
stopper on the rim of the lens element, press down, and turn. Make sure
you are pressing on the metal rim and not the glass. If the glass rises
above the level of the rim, you can hollow out the stopper with a rotary
tool. Never use ordinary pliers or wrenches to remove lens elements,
you will scratch the metal rim, or worse. If an element doesn't come
free with finger pressure or a rubber stopper, have it removed by a
technician. You shouldn't have to clean inner surfaces often.
LENS ATTACHMENTS
- Many highend Kodak lenses made
in the 1940s and 50s were excellent and their performance compares favorably
with much newer high quality lenses. For example look at the performance
of a ca 1940
Kodak Anastigmat Special tested by Chris Perez and compare it to
the performance of much newer and more expensive lenses on his site.
Because older lenses had less sophisticated coatings, they produce more
flare. You can reduce flare significantly by using high quality multicoated
filters and effective hoods.
- Kodak produced adapter rings
for all of their lenses. Many domestic Kodak lenses generally did not
have front cells threaded to receive screwin adapter rings. Ektra Ektars
and Medalists all use screwin attachments. Kodak screwon adapter rings
were numbered; slip-on adapter rings were measured in inches and sometimes
millimeters. Lens attachment specifications for Ektar lenses are included
in the Ektar data tables on this
site. You may be able to find Kodak or aftermarket adapter rings on
eBay or at camera shows.
- Lens caps are generally a good
thing, unless they are made from materials that can contaminate lens
surfaces and coatings. Beware cheap lens caps.

†
Kodak
Professional Data Book: Use, Maintenance, and Repair of Professional Equipment,
© 1952, Eastman Kodak
Co.
|
|
|

